
FAQ and how-to
User Guide
Everything you need to know about setting up and using PhotoWatch.
FAQ and how-to
Everything you need to know about setting up and using PhotoWatch.
Or jump to the detailed User Guide ↓
Get started
Three steps is all it takes. PhotoWatch does the rest.
1
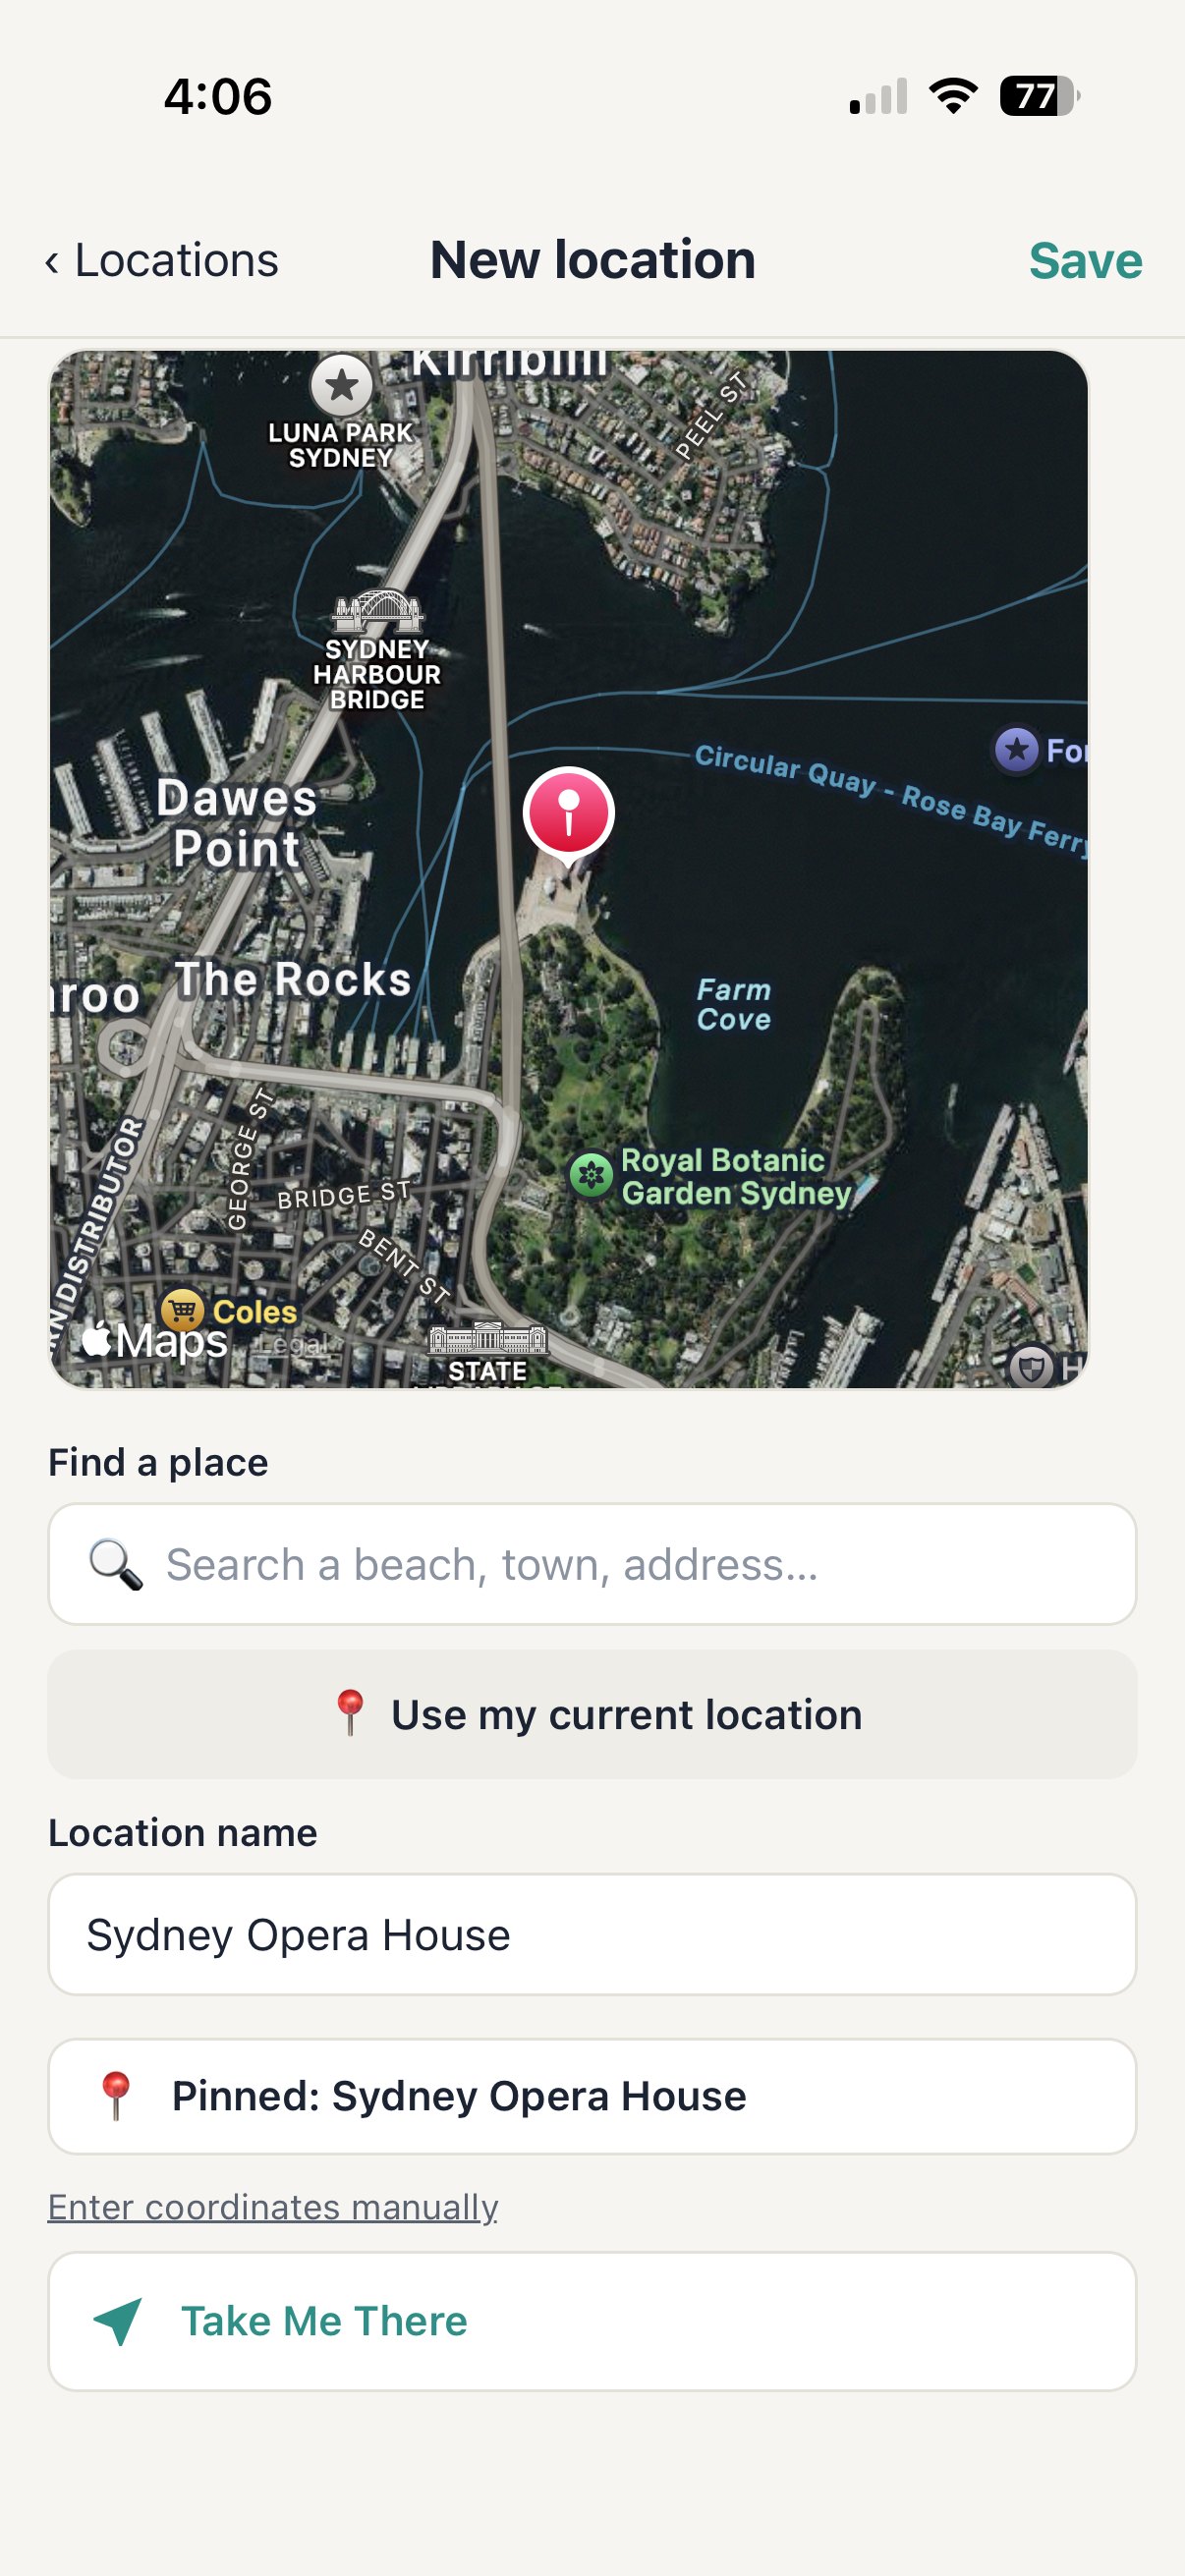
Tap the Locations tab at the bottom of the screen (the pin icon). Tap the + in the top-right (or + Add location) and search for a spot you love to photograph: a beach, a headland, a lookout. Or just zoom in to find and tap your location on the map! PhotoWatch works with locations anywhere in the world. Tap Add to save it, then repeat for as many spots as you like.
Tip: When you save your very first location, PhotoWatch sets up a ready-made sunset alert for it and shows you around the alert editor with a short tour. Free users can save up to 3 locations. Upgrade to Pro for unlimited saved locations.
2
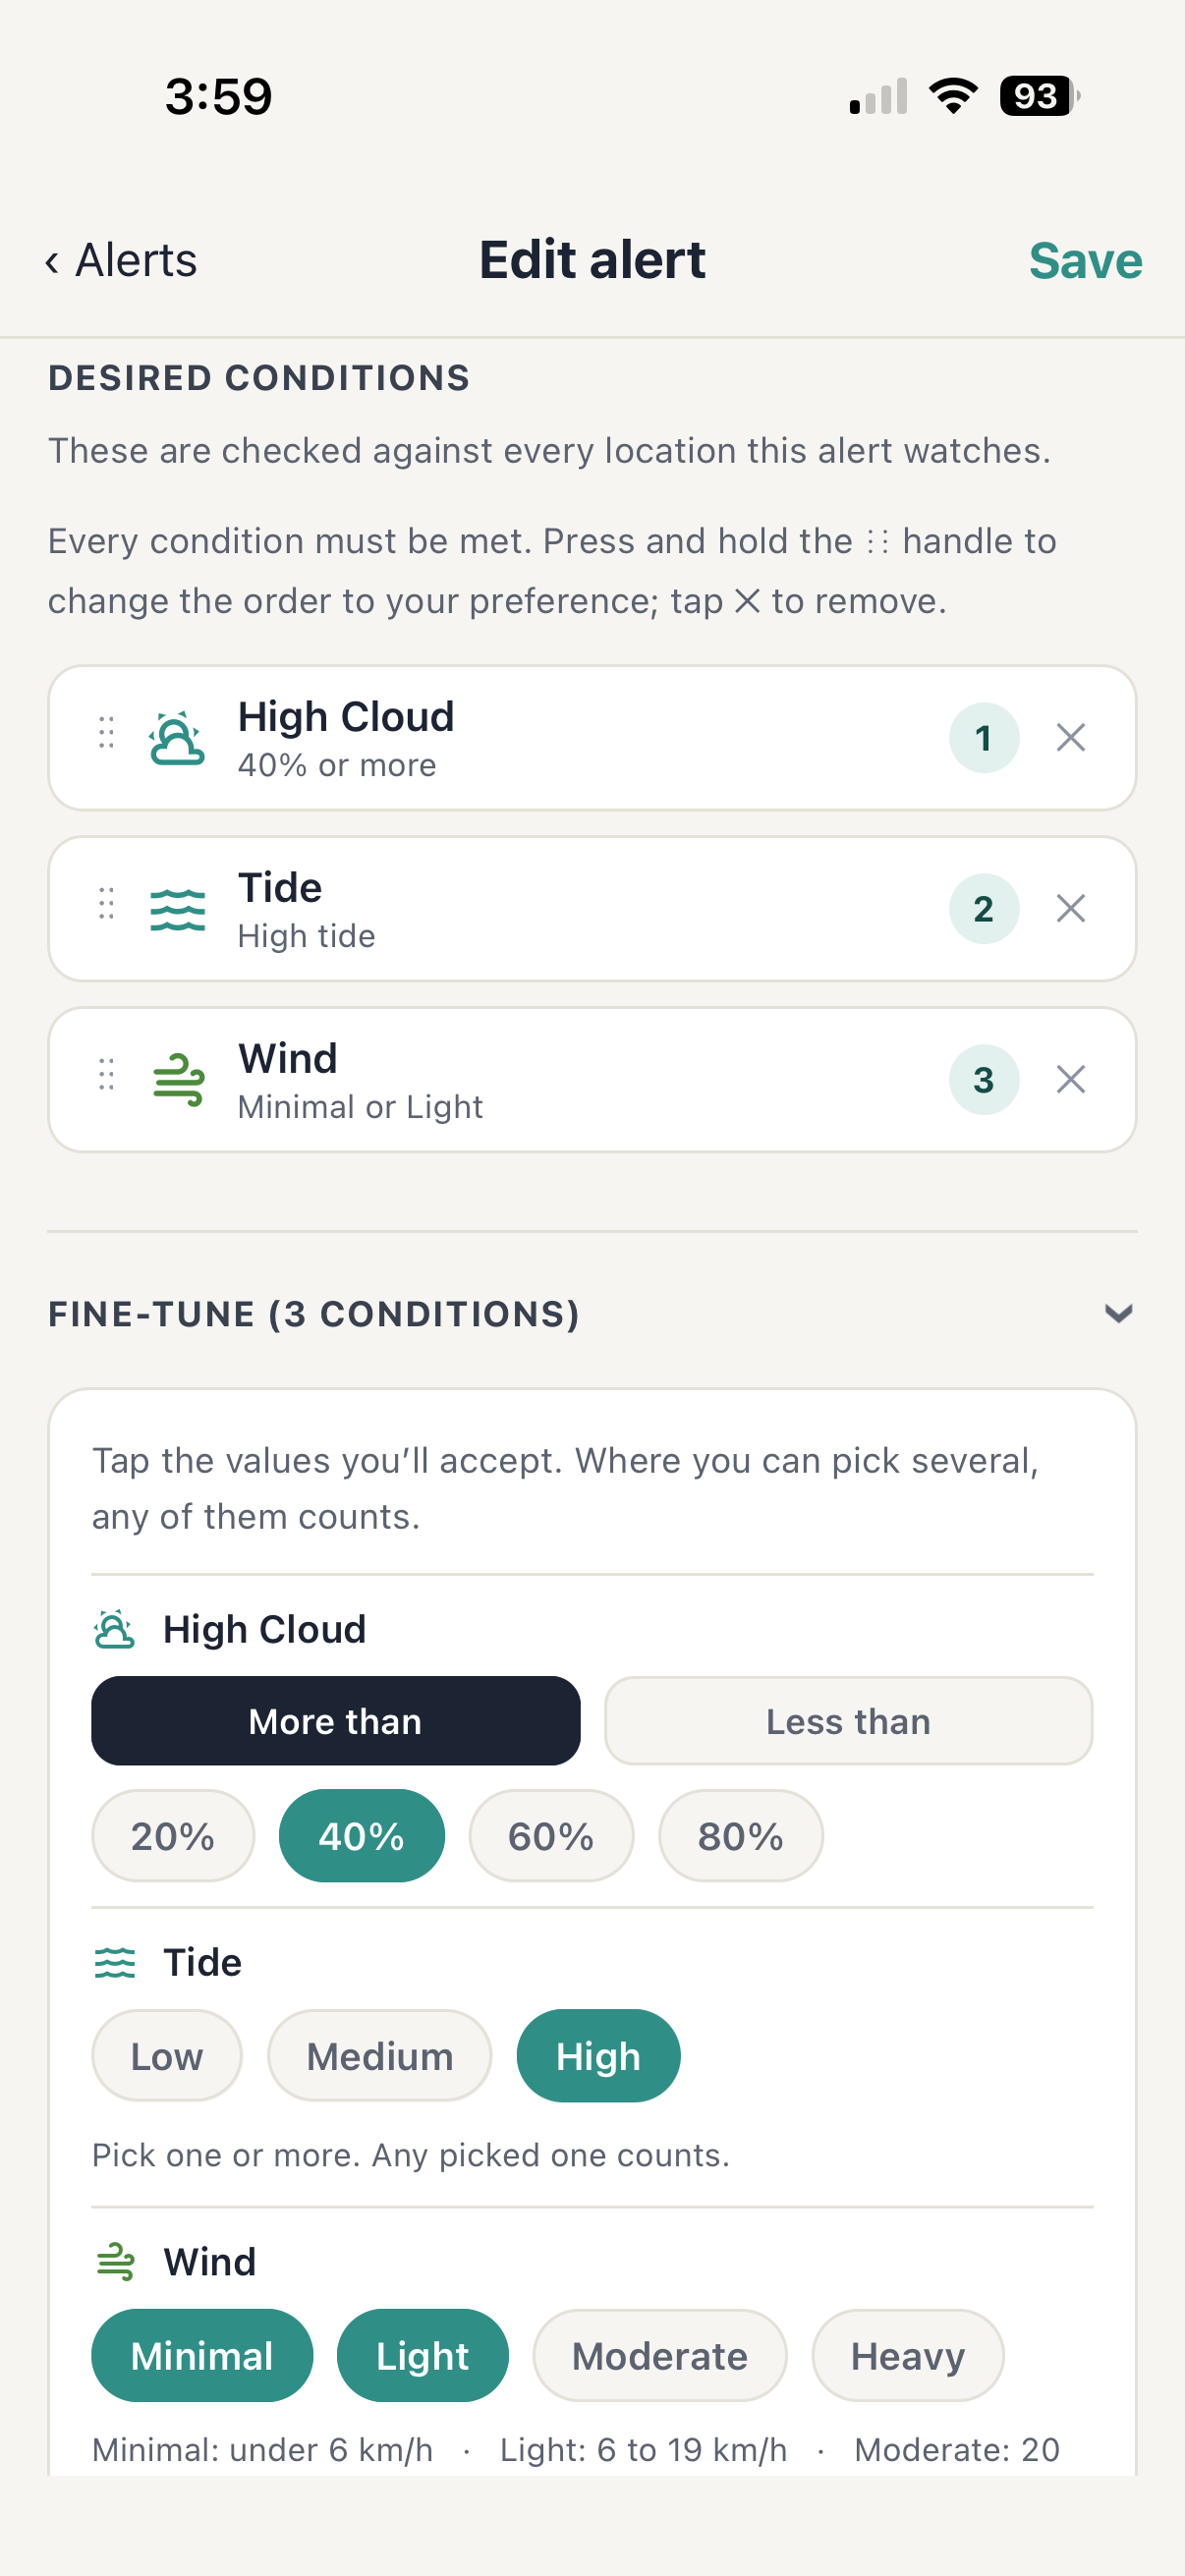
Tap the Alerts tab (the bell icon), then tap + New alert. Give it a name, choose a Shoot type (Sunrise, Sunset, Astro, or Custom), pick the locations you want it to watch, and dial in your conditions: cloud cover, wind, tides, swell, moon phase etc. Every condition you add must be met before you’re alerted. The app fills in sensible defaults, so you don't have to change anything if you don't want to. Set your Notification Advance Time to tell the app how far ahead you want to be alerted. 12 hours before sunrise means you'll get the notification the evening before, in time to set your alarm.
Tip: Make sure push notifications are on in Settings → Notifications, otherwise alerts can't reach you.
3
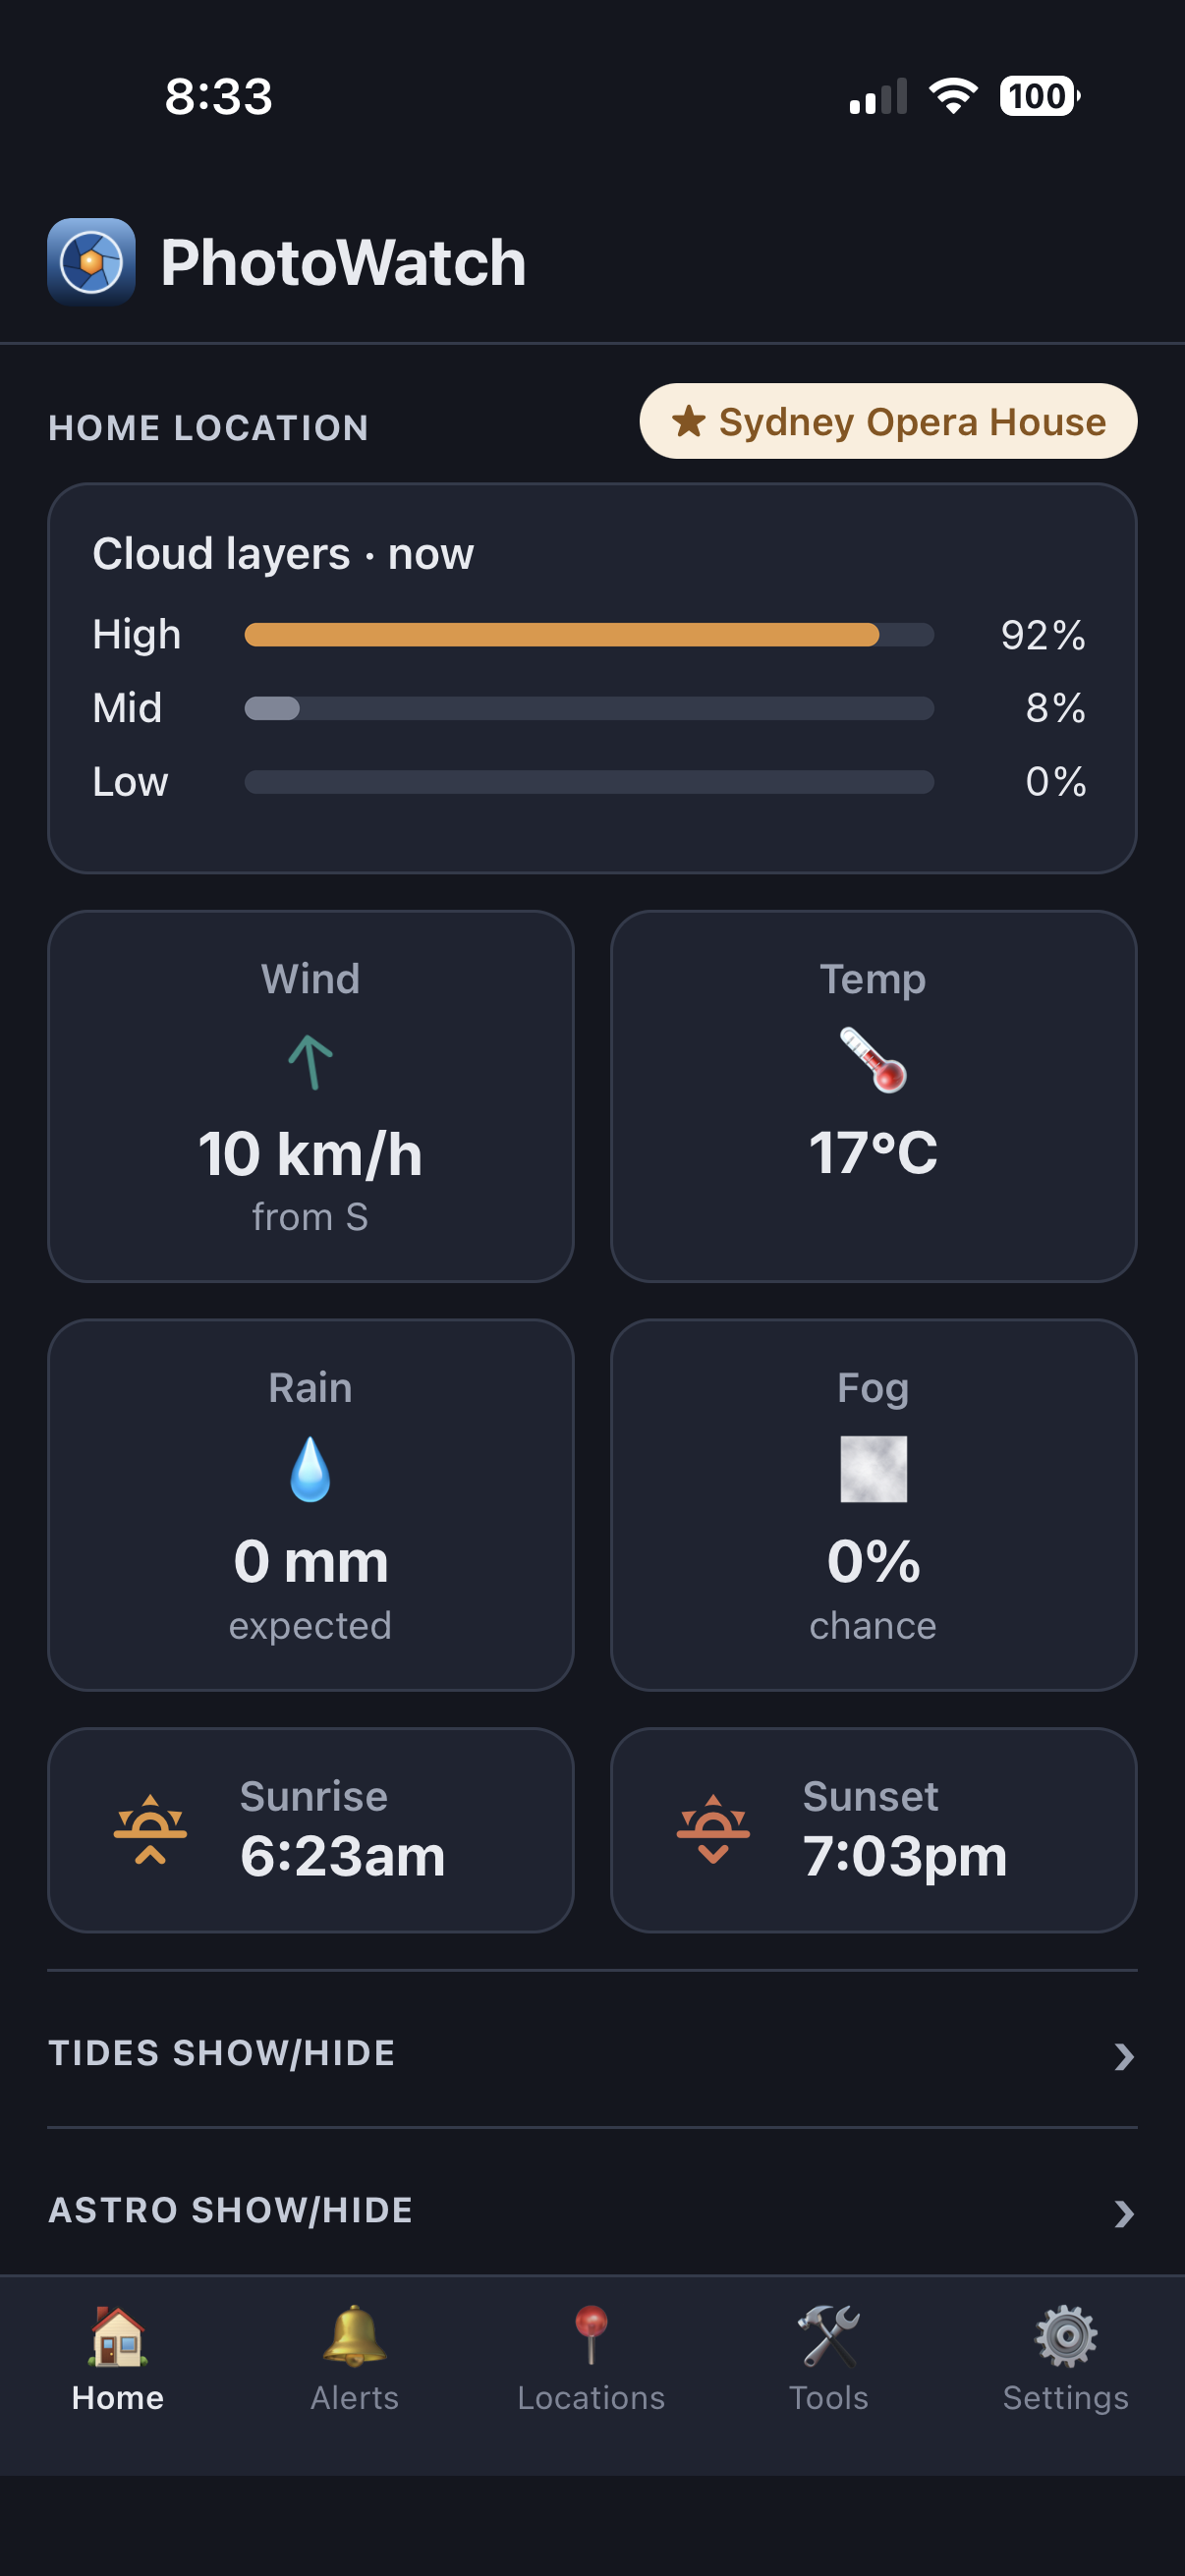
Tap the Home tab (the house icon) to see an at-a-glance snapshot of current conditions at your Home location including cloud cover, wind, temperature, tide height, swell, and astro information. It updates automatically, so you always have the latest picture before heading out.
Tip: Set a Home Location: tap any saved location → tap ‘Set As My Home Location’, or do it from the Home screen by tapping the Home Location yellow pill. This is what the Home tab displays.
That's it! PhotoWatch is now watching around the clock!
When everything lines up for a great shoot, you'll get a notification. When it doesn't, you won't hear a thing. See how alerts work, step by step →The one-minute version.
PhotoWatch is your personal conditions-watcher for landscape, seascape and astro photography. You tell it where you love to shoot and what good conditions look like for you: clear skies, a low tide, a new moon, calm winds, and so on. Then it quietly monitors the forecasts around the clock and sends a notification straight to your phone the moment a spot is lining up for a great shoot.
The whole idea is "set and forget." No more refreshing five different weather and tide apps at 4am. Set your alerts once, then just keep your batteries charged and wait for the buzz on your phone.
It works anywhere in the world, because PhotoWatch calculates conditions from global weather and astronomy data.
PhotoWatch keeps getting better. See what has arrived in each version on the What’s new page.
Your shooting spots: the beaches, headlands, waterfalls and lookouts you want PhotoWatch to keep an eye on.
Yes. When you're standing on the spot, tap Use my current location in the location editor. PhotoWatch grabs your GPS position and even tries to name the place for you. If it asks for location permission, tap allow.
Yes. In the location editor, zoom in and tap the map to drop a pin, and PhotoWatch names the spot for you. Tap a named landmark on the map, such as a beach, a lookout or a national park, and its name fills in for you.
Open a saved location, or an alert notification, and tap Take Me There for driving directions from where you are. It opens the maps app you choose in Settings → Maps App: Apple Maps, Google Maps or Waze on iPhone, and Google Maps or Waze on Android. If the app you chose isn’t installed, the directions open on its website instead.
Your Home Location is the spot shown at a glance on the Home screen. To set one:
It takes effect immediately. You'll always have exactly one Home Location, and choosing a new one gently makes the old Home an ordinary saved spot.
Tap any location in the Locations tab to open it. Change its name or re-pin it, then tap Save. To remove it, scroll down and tap Delete location.
On the free plan you get 1 Home Location plus 2 saved locations, three spots in total. PRO
With PhotoWatch Pro that limit disappears entirely: save as many spots as you like, all over the world. If you shoot more than a handful of locations, this alone is worth the upgrade.
Absolutely. In the location editor tap Enter coordinates manually and type the latitude and longitude (for example -33.7011, 151.2971). Most people never need this, since the search box and GPS button cover almost everything, but it's there for a precise, unnamed spot.
It's a quick reminder of how many of your alerts are keeping an eye on that spot. A location is "watched" simply by being included in an alert, so there's no separate on/off switch to worry about. If it says "Not used by any alert yet," add it to an alert in the Alerts tab to start watching it.

The heart of PhotoWatch. An alert is a "set and forget" rule: watch these spots, for these conditions, and notify me when they line up.
To help you get started, saving your very first location (when you have no alerts yet) brings up Great, … is saved. Tap Next and PhotoWatch creates a sunset alert for that spot, with High Cloud as the condition, 6 hours’ notice and every day ticked, then opens it with a short six-step tour of the alert editor. Tap Next to move through the tour, or Skip at any time.
The alert is already saved and switched on, so PhotoWatch is watching from that moment. Change anything you like and tap Save, or delete it if you’d rather start from scratch.
It sends a notification straight to your phone. When an alert finds a spot lining up nicely, PhotoWatch pings you with the spots where every condition is met and when to be there, so you can grab your gear and go. That's the whole point: you don't have to watch the app, because the app watches for you and taps you on the shoulder at the right moment.
You stay in control of these in Settings (Pause All Alerts in Notifications to silence everything at once), so PhotoWatch only buzzes you when you want it to.
It tells PhotoWatch when your shoot happens so it can check conditions for the right moment:
Inside the alert, tap the Locations for this alert header to expand it, then flip on each spot you want. The same set of conditions is scored against every location the alert watches, so a single alert can compare all your favourite beaches at once and tell you which one's looking best.
Under Add conditions, tap any condition to add it to your alert: Clear Skies, Wind, Tide, Moon Phase, and so on. (See Conditions explained for what each one means.) Conditions marked PRO show a small lock on the free plan.
Every condition in your list must be met before PhotoWatch sends an alert, so only add the ones that really matter to you. The order is simply how your list is arranged:
There's a picture guide on the How to set up Alerts page.
It's how many hours before your shoot you want the deciding check to run, in other words, how much notice you need to get ready and travel. Set it to 12 hours, for example, and for a 6:00am sunrise PhotoWatch does its check around 6:00pm the evening before, giving you the night to plan.
On the Alerts list, each alert has an on/off switch on the right, so you can flip it off to pause an alert without deleting it. Tap the card ("Tap to edit ›") to open it, make changes and Save, or scroll down inside and tap Delete alert.
To delete several alerts at once, tap Edit at the top left of the Alerts list, tick the alerts you want to remove (or tap Select all), then tap Delete at the bottom.
Yes, and this is one of the nicest touches. Alerts are unlimited on every plan, so the same beach can have a Sunrise alert wanting clear skies and calm winds, and an Astro alert at the same spot wanting a new moon and the Milky Way up. Each alert judges the spot on its own terms.
The notifications sent to your phone are also kept under "My last 7 notifications" at the bottom of the Alerts tab. Tap one to see which locations lined up and how each condition looked. Tap Clear to tidy the list. And remember, silence is the point: no news simply means conditions weren't worth heading out for.
Every condition you can add to an alert, in plain language.
These let you ask for the kind of cloud you want. High Cloud (thin, wispy cloud up high) is the classic recipe for a fiery sunrise or sunset. Medium and Low Cloud are there for moodier or more dramatic looks. Each layer is checked on its own: by default a layer counts when it covers 60% of the sky or more. With Pro you can set More than or Less than 20, 40, 60 or 80% for each layer (the value itself counts), e.g. high cloud more than 40% and low cloud less than 20% for a glowing sky over a clear horizon.
Asks for a clean, cloud-free sky, ideal for astro work, star trails, or a crisp blue-hour scene. Every cloud layer must be below the limit: by default less than 10% cover. With Pro you can choose Cloud cover less than 5%, 10% or 20%.
Calm air, perfect for glassy water reflections, sharp long exposures, and keeping your tripod steady. By default PhotoWatch looks for a Light breeze (6 to 19 km/h). With Pro you can pick one or more of Minimal (under 6 km/h), Light, Moderate (20 to 38 km/h) and Heavy (39 km/h and above). Speeds show in the wind units you choose in Settings.
Watches the rain outlook so you can plan around a shower, or chase the drama of a storm and the rainbow that follows. By default any rain counts. With Pro you can pick one or more of None (dry), Light (under 2.5 mm an hour), Moderate (2.5 to 7.6 mm) and Heavy (over 7.6 mm).
For when you want atmosphere: misty forests, fog rolling over headlands, that soft, moody light. By default it looks for Light fog (20 to 39% of the area), and the fog has to last, so a brief one-hour patch doesn’t count. In Fine-tune you can pick one or more of None (under 20%), Light (20 to 39%) and Heavy (40% and above). Fog alerts are a Pro feature; the fog reading on Home stays free for everyone.
Made for waterfalls, which look their best a day or two after good rain. Recent Rain adds up the rain on the days before your shoot and is met when the total reaches your minimum. In Fine-tune, choose the Rainfall Window (Day before, 1-2 days before or 1-3 days before) and the Minimum in Rainfall Window (5, 10, 20 or 40 mm). By default it looks for at least 20 mm over the 3 days before.
PhotoWatch records the rain that has actually fallen at your spots, and uses the forecast for days still to come, so an alert can arrive early when good rain is on the way. Rain is recorded from the time a spot is first used, so a new spot needs about three days before Recent Rain can work there; the Alerts tab shows Rain history building until then. A Pro feature.
An early heads-up for storm drama: brooding skies, distant lightning, and the moody light that comes with an approaching front. It's called Potential because thunderstorms are hard to pin down: PhotoWatch flags when thunder is showing in the forecast for your shoot time, not a cast-iron promise one will hit your exact spot. A Pro feature.
Seascape photographers live and die by the tide. Add the Tide condition, then in Fine-tune pick Low, Medium or High (or more than one: any picked one counts) to catch exposed rock shelves at low tide, dramatic surge at high tide, or anything in between. Tide is a Pro feature, powered by a professional global tide model.
Swell is about what the sea looks like. Add the Swell condition, then in Fine-tune pick Low for glassy, calm water, High for big, powerful surf, Medium for something in between, or more than one. Bands are based on actual wave height: Low under 1.25 m, Medium 1.25 to 2.5 m and High 2.5 m and above, so they work anywhere in the world from day one. A Pro feature.
Add the Moon Phase condition and then, in Fine-tune, pick the moon you want for this shoot: New, Crescent, Half, Gibbous or Full (you can pick more than one). Astro shooters usually want a New Moon for the darkest possible skies; a Full Moon is lovely for lighting a landscape at night. PhotoWatch counts it as "met" when the shoot falls within 2 days of any phase you picked.
The bright, photogenic heart of the Milky Way (in Sagittarius) is only shootable when it's above the horizon and the sky is truly dark. This condition checks exactly that for your spot and time, so your astro alerts only fire when the core is actually up and the night is dark enough to capture it. A Pro feature, and it pairs beautifully with a New Moon target.
A live, at-a-glance dashboard for your Home Location.
The current outlook for your Home Location: a cloud breakdown (high / mid / low), plus wind, temperature, rain and fog, and today's sunrise and sunset times. It's the quick "should I bother?" glance before you dig into your alerts.
If your Home Location is in a different time zone from your phone, its times are shown in that location’s own local time, with the note The chosen location’s local time is shown.
It only appears when something would stop your alerts reaching you:
Once everything is in order, the tile disappears.
Those richer readings, like live tide & swell, moon rise/set and phase, and Galactic Core rise/set, are Pro features. PRO With Pro, they appear on Home grouped into tidy sections.
Yes. Pro members get "Tides Show/Hide" and "Astro Show/Hide" headers on Home, so you can tap either to collapse or expand that group. Not everyone shoots seascapes or the stars, so you can keep Home showing only what matters to you. Your choice is remembered.
Home gives you an instant read on your default location: cloud layers (high, mid, low), wind, temperature, rain and fog, plus today's sunrise and sunset times. It's the quick "should I bother?" check before you dig into your alerts.
With Pro, tide and swell readings, moon phase, and Galactic Core rise and set all appear here too, with each section collapsible so you see only what matters to you.

Handy extras for when you're out shooting. Timer & ND, the Time-lapse Calculator and the Star Exposure Calculator are free for everyone; Colour Temp, the Astro Planner, the Tide Planner and the Waterfall Planner are Pro features.
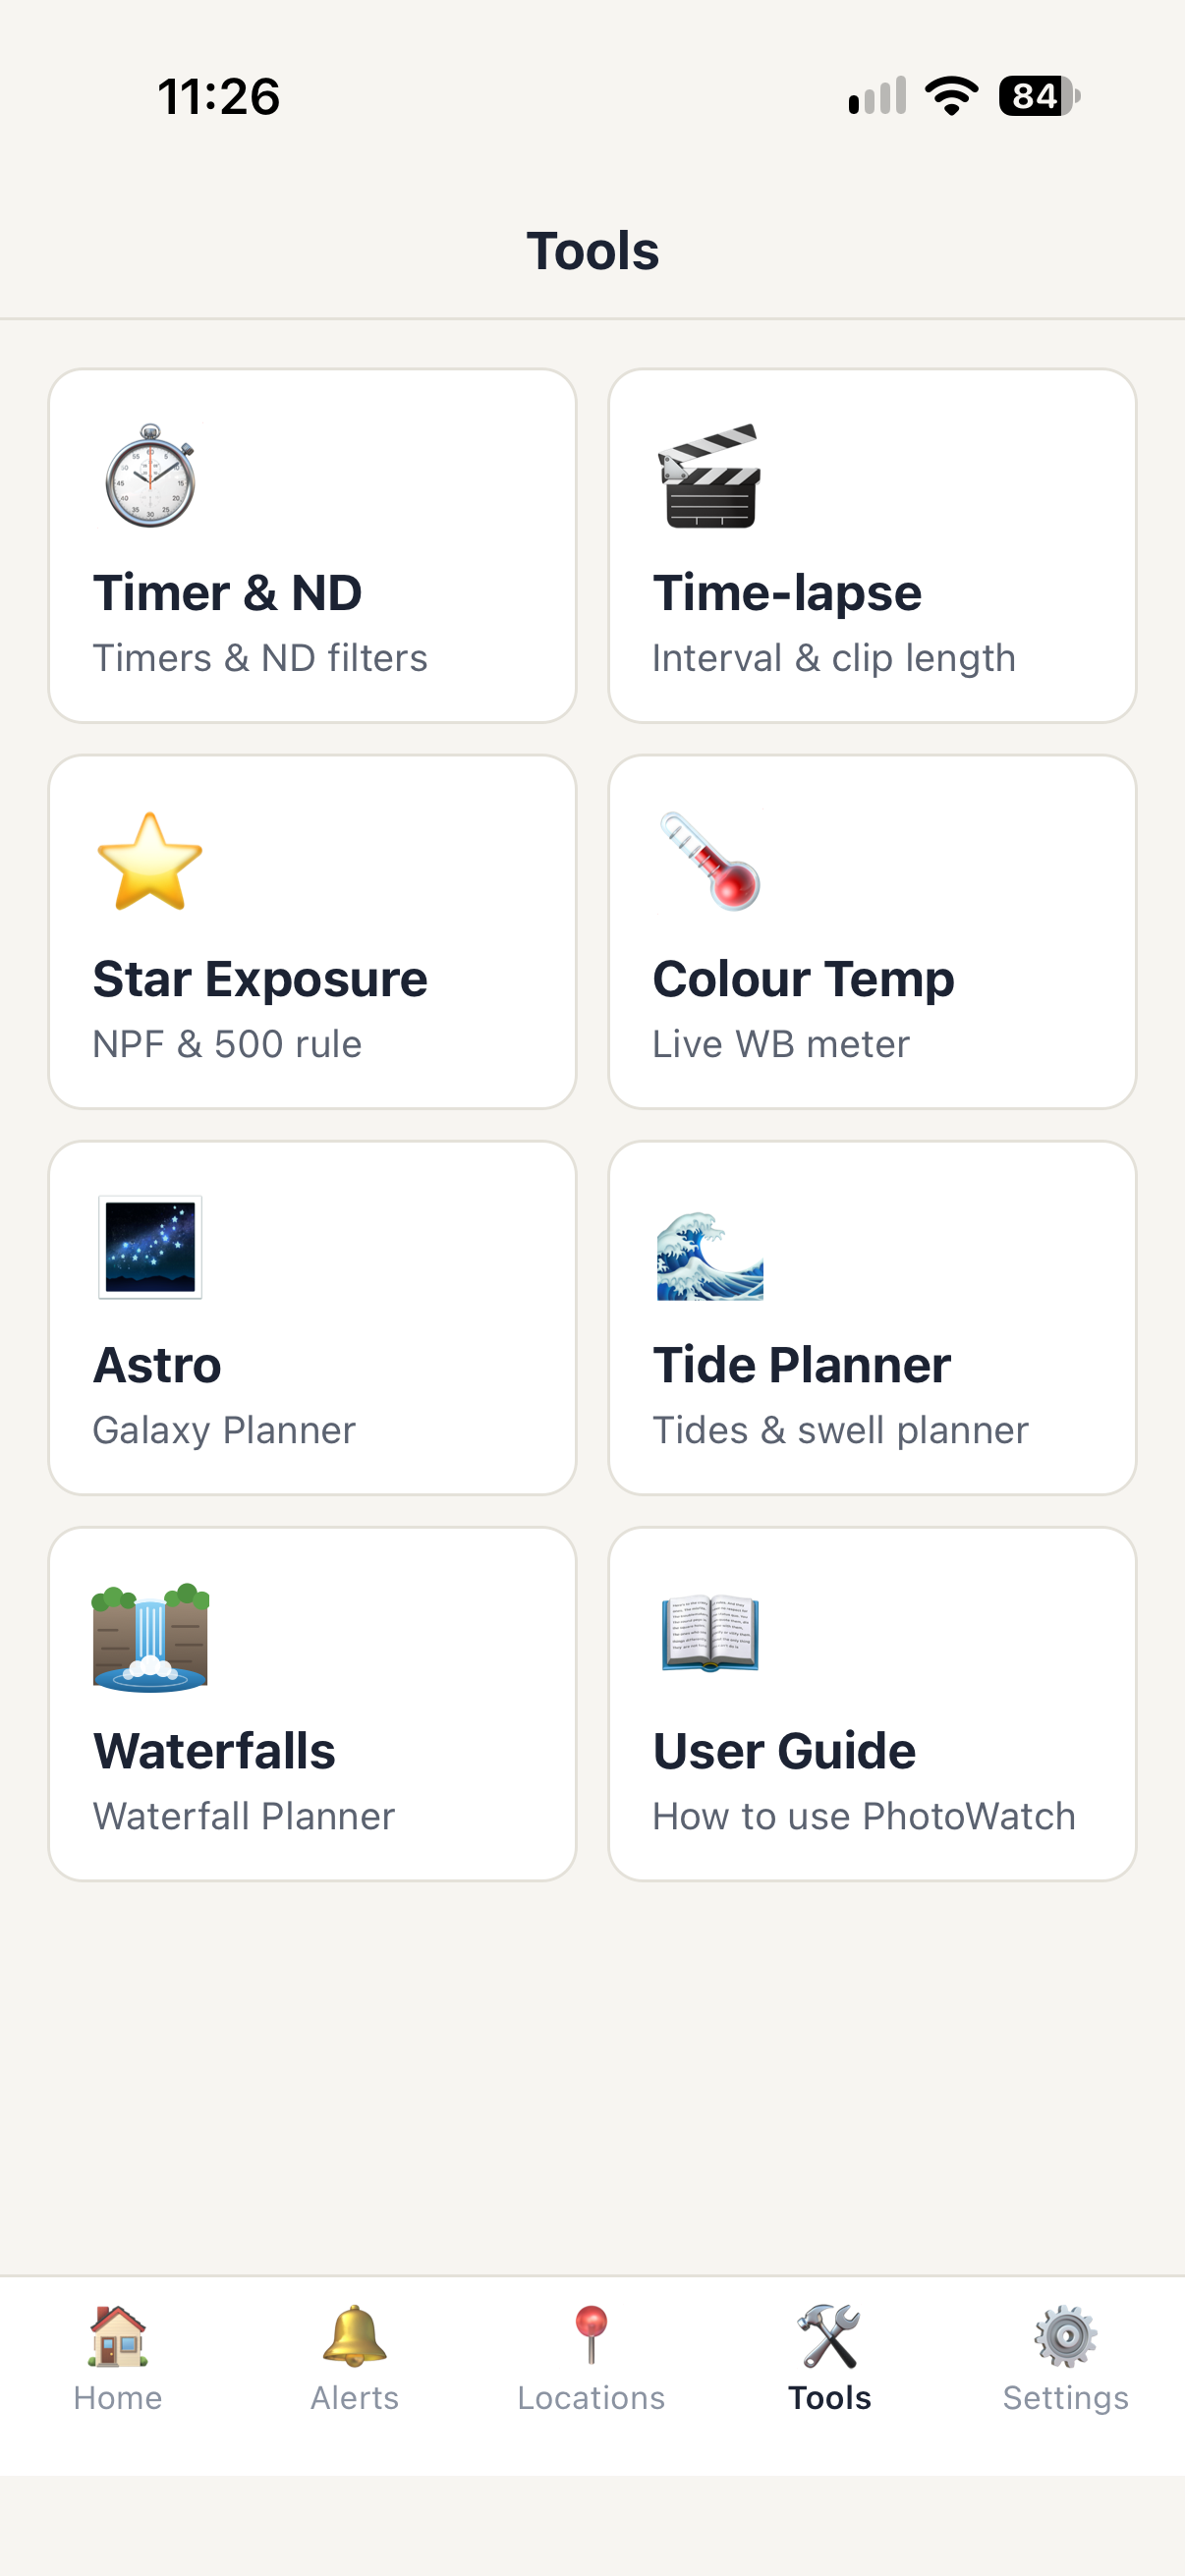
Eight tools in one tab, with no separate apps and no fumbling between screens. Work out how an ND filter changes your shutter speed and time the exposure on the same screen, plan your time-lapse interval, or nail your star exposure with NPF and the 500 Rule.
Pro adds Colour Temp, which reads the light's colour temperature live in Kelvin from your camera sensor, plus the Astro Planner for full-sky Galactic Core planning, the Tide Planner for tide and swell predictions at your shoot location, and the Waterfall Planner for catching waterfalls after good rain. There's also a built-in User Guide so you always have help at hand.
Three tabs in one tool. Use the Stopwatch to time a long exposure by feel, or the Countdown so you know exactly when to close the shutter on a bulb-mode shot: it starts at 00:00, set the minutes and seconds with the + / − buttons, then tap Start. Reset takes it back to 00:00.
On the ND Exposure tab, meter your shot without a filter, pick the ND (neutral-density) filter you're about to screw on, and PhotoWatch works out the correct new exposure time, since each stop of ND doubles the exposure. Best bit: tap Use as Countdown Timer and the result goes straight to the Countdown tab, so you can fit a 10-stop filter, hit start, and wait for the buzz.
Plan your time-lapse before you set up. Enter any three of the four numbers (Shoot Duration, Interval (time between shots), Number of Frames and Clip Length) and the calculator works out the fourth automatically. Pick your frame rate (24, 25 or 30 fps) and you'll always know exactly how many shots you need and how long your final clip will be. Perfect for making sure a two-hour storm doesn't turn into a 30-second clip when you wanted a full minute.
Find the longest shutter speed you can use before the stars start to trail. Enter your focal length, aperture, crop factor (e.g. 1.0× full-frame, 1.5× APS-C), sensor megapixels and, optionally, the declination of your subject in the sky. PhotoWatch then shows two results side by side so you can compare:
A short note explains which to trust for your setup. A free tool and no account needed.
Point your camera at the scene and fill the on-screen box with your subject. Colour Temp reads the light's colour temperature live, in Kelvin, straight from your camera sensor, and updates on screen as you move. It gives you an accurate field reading to help you match your white balance to the light. A Pro feature. PRO
Use it to match your camera's white balance to the light in front of you, whether that's warm golden-hour light, cool open shade, or a mix of artificial light, so you can get more accurate colour in camera. There's also a built-in white-balance reference table (candlelight ≈ 1900K through to clear blue sky ≈ 10000K): a lower Kelvin looks warmer and more orange, a higher Kelvin looks cooler and more blue.
An interactive sky dome that shows where the Galactic Core sits across the entire night from any of your saved locations. Drag the slider to move through the night: the dome updates in real time as the Milky Way arc shifts across the sky. Designed to help you find and plan the best window to shoot. PRO
The dome uses real Milky Way band data and recomputes as you drag, so what you see matches what you'll find at your location.
A live tide and swell tool built for coastal photographers. See the full tide waveform for any of your saved locations, or your current GPS position, so you know exactly what the water is doing and when. PRO
A Pro feature, included alongside the Astro Planner, the Waterfall Planner and the Colour Temp Meter in the PhotoWatch Pro subscription.
Waterfalls look their best a day or two after good rain. The Waterfall Planner shows the rain at any of your saved locations and turns it into an alert that lets you know when the falls should be flowing. PRO
Waterfall alerts have the built-in cloud and rain checks switched off, so a grey morning after heavy rain won’t stop them. Add cloud, fog or wind in the alert editor if those matter to you.
Make PhotoWatch feel like yours.
In the Settings tab you can set your units (Metric / Imperial), wind (km/h, mph or knots), temperature (°C / °F), time format (12h / 24h) and the Maps App that Take Me There opens, plus flip on Dark Mode.
Settings → Notifications has a Pause All Alerts switch. Turn it on to silence every alert at once. To re-enable notifications, go to the Alerts tab and turn on each individual alert you want to receive.
On Android, a Keep alerts working row appears here while Android’s Manage app if unused setting is on. Android can pause apps you haven’t opened for a few months, which would stop your alerts. Tap Open settings and turn it off (on some phones it’s called Pause app activity if unused). The row disappears once it’s off. iPhone users don’t need to do anything.
Settings → Preferences → toggle Dark Mode. The whole app re-colours instantly, and it remembers your choice next time you open it.
If you signed in to PhotoWatch (a Pro feature), you can delete your account and the data linked to it right inside the app:
1. Open PhotoWatch and go to Settings → Account.
2. Tap Delete account and confirm.
What is deleted: your PhotoWatch account and sign-in (email address), your backed-up Locations and Alerts, and your notification token. Deletion is permanent and your data will be removed from our servers.
Can't open the app? (for example, you've already uninstalled it) Send us a request through our contact page, using the email address you signed in with, and we'll delete your account and data for you.
Pro subscription: deleting your account does not cancel your subscription. Subscriptions are managed by Apple or Google, so cancel it in your App Store or Google Play subscriptions.
If you never signed in, PhotoWatch has no account for you. Uninstalling the app removes everything on your phone. If you'd also like the copy our servers use to send your alerts removed, just ask us through our contact page.
Keep your setup safe, and unlock the full app.
Tap any Pro feature or the Upgrade prompt anywhere in the app and the PhotoWatch Pro sheet slides up. Pro is a yearly subscription, shown in your local currency in the App Store or Google Play. It unlocks unlimited locations, Fine-tune for every condition, Fog, Recent Rain, tide & swell, moon-phase and Galactic Core conditions, the Colour Temp, Astro Planner, Tide Planner and Waterfall Planner tools, and cloud backup & restore.
Sign in (with your email, Google or Apple) and PhotoWatch safely backs up your Locations and Alerts to your account, so they're never lost, and you can restore them if you change devices. Just sign in on your new phone and choose Restore. A Pro feature. PRO
Go to Settings → Account, enter your email and a password (at least 6 characters) and tap Create account (or Sign in if you already have one). Once you're in, your data backs up automatically, and you can tap Back up now any time.
Yes. Signing in also helps us help you. If you ever contact us about your subscription, we can find your account straight away from your email address. If you haven't signed in, we can't look up your purchase, so it takes much longer to sort out. PRO
Yes. Everything you set up is saved right on your phone and survives closing and reopening the app. Signing in (Pro) simply adds an off-device backup, so nothing is lost if you change phones.
How far to trust the forecasts.
Yes. PhotoWatch calculates conditions from global weather and astronomy data, so it works for any spot you can pin, whether that's a local beach or a bucket-list location on the other side of the planet.
Planning a trip? The Astro and Tide Planners show the location’s own local time when it’s in a different time zone from your phone.
PhotoWatch takes great care to check conditions, but nature has the final say: forecasts can change between an alert and your shoot time. Treat an alert as a strong "worth heading out" signal rather than a cast-iron guarantee.
PhotoWatch does a lot for free, and Pro turns it into a complete tide-, swell-, rain- and sky-aware planning tool.
| Feature | Free | Pro |
|---|---|---|
| Locations | ||
| Save your shooting spots (search, GPS or exact coordinates) | ✓ | ✓ |
| How many locations you can keep | 1 Home + 2 saved | Unlimited |
| Set any spot as your Home Location | ✓ | ✓ |
| Alerts & notifications | ||
| Create alerts (unlimited on both plans) | ✓ | ✓ |
| Notifications sent straight to your phone | ✓ | ✓ |
| Shoot types: Sunrise, Sunset, Astro, Custom | ✓ | ✓ |
| Alerts only when every condition is met | ✓ | ✓ |
| Fine-tune each condition (e.g. high cloud more than 40%) | ✕ | ✓ |
| Switch off the built-in cloud and rain checks for an alert | ✕ | ✓ |
| Choose how often to check & how far ahead | ✓ | ✓ |
| Conditions you can watch for | ||
| Cloud: high, medium and low | ✓ | ✓ |
| Clear Skies | ✓ | ✓ |
| Wind | ✓ | ✓ |
| Rain | ✓ | ✓ |
| Fog | ✕ | ✓ |
| Recent Rain (rain over the days before, for waterfalls) | ✕ | ✓ |
| Potential Thunderstorm | ✕ | ✓ |
| Tide: Low / Medium / High (pick one or more) | ✕ | ✓ |
| Swell: Low / Medium / High (pick one or more) | ✕ | ✓ |
| Moon Phase (pick one or more phases, e.g. New Moon) | ✕ | ✓ |
| Galactic Core (Milky Way) visible | ✕ | ✓ |
| Home dashboard | ||
| Live cloud layers: high, mid and low | ✓ | ✓ |
| Wind | ✓ | ✓ |
| Temperature | ✓ | ✓ |
| Rain | ✓ | ✓ |
| Fog reading | ✓ | ✓ |
| Sunrise and sunset times | ✓ | ✓ |
| Live tide & swell readings | ✕ | ✓ |
| Moon rise/set & phase, Galactic Core rise/set | ✕ | ✓ |
| Tools & backups | ||
| Timer & ND (stopwatch, countdown and ND Exposure Calculator) | ✓ | ✓ |
| Time-lapse Calculator | ✓ | ✓ |
| Star Exposure Calculator (NPF and 500 rule) | ✓ | ✓ |
| Colour Balance camera meter (read the light's colour temperature) | ✕ | ✓ |
| Astro Planner with interactive Galactic Core dome view and rise/set times | ✕ | ✓ |
| Tide & Swell Planner with tide heights, swell direction and surf conditions | ✕ | ✓ |
| Waterfall Planner with recorded and forecast rain | ✕ | ✓ |
| Dark mode & display preferences | ✓ | ✓ |
| Cloud backup & restore if you change devices | ✕ | ✓ |
Unlock the full picture: the tides, the swell, the moon and the Milky Way.
PhotoWatch · FAQ & User Guide · What’s new
PhotoWatch is free to download on iPhone and Android, and you can upgrade to Pro any time inside the app. See what Pro adds